If you’ve ever walked a factory line and wondered why one e-bike frame feels “solid” while another feels like it’s one season away from trouble, you’re not imagining things. In B2B, a frame isn’t a nice-to-have part—it’s the part that quietly decides your return rate, your safety exposure, and how much your brand gets trusted in the real world.
I’m Leo Liang from the ClipClop team in Guangzhou. I’ve spent years looking at frames that survive thousands of rental kilometers—and frames that crack long before the marketing photos stop looking fresh. The difference usually shows up in four places where tubes and loads meet, and where welding quality (plus heat control) either protects your business or slowly leaks money.
This guide is a practical, buyer-focused deep dive into those four junctions: head tube, motor mount, battery housing, and dropouts. It’s not about “pretty beads.” It’s about penetration, alignment, heat affected zones, and fatigue resistance—things that matter when your bikes are out in rain, dust, curbs, and customer hands.
The four junctions you should inspect before signing a bulk PO
Below is a quick checkpoint table you can hand to a QC inspector or use during a factory audit. The goal is simple: spot structural risks early, before they become warranty claims.
| Critical junction | What it suffers in real use | What “good” looks like | Red flags buyers can catch | Tests / checks to ask for |
|---|---|---|---|---|
| Head tube (to top/down tube) | Impacts, braking, steering leverage | Full penetration, consistent bead, controlled HAZ, optional gusset | Undercut, uneven bead, visible porosity, distortion in head angle | DPT for micro-cracks, fatigue test logs, alignment/CMM report |
| Mid-drive motor mount | Constant torsional load + vibration | Flat CNC mounting surface, reinforced structure, tight tolerance | Creak-prone fit, bolt loosening, hairline cracks near mount | CMM dimensions, sample cross-section, hardness log after heat treatment |
| Battery mount area (downtube cavity/rails/bosses) | High-frequency vibration + impacts + water ingress | Clean internal rails, smooth fit, corrosion protection inside cavity | Rattle risk, weld slag inside cavity, weak boss welds | UT on hidden welds, pull-out test, coating spec (ED + powder) |
| Rear dropouts | Brake load + rider weight + motor torque | Thick CNC dropout, full fusion, perfect spacing/alignment | Rotor rub, shifting issues, anti-rotation missing | Alignment gauge record, impact/fatigue tests, torque-arm integration review |
Keep this table in your sourcing folder. If a supplier can’t speak clearly about these points, it’s often a sign they’re optimizing for first-sale cost, not lifecycle reliability.
1) Head tube junction: the frame’s stress “truth serum”
On an e-bike—especially off-road or high-speed—nothing punishes a frame like the head tube zone. Every hard brake, curb hit, or pothole turns the head tube into a lever arm that tries to rip the down tube and top tube connections apart. When this junction fails, it’s not a minor inconvenience. It’s a catastrophic safety event.
What I look for first is consistency: bead width, ripple uniformity, and zero undercut. Undercut is sneaky because it can look “sharp and clean” to a non-technical eye, but it creates a stress riser that accelerates fatigue cracking. A strong head tube weld should look boring—in the best way.
The second check is heat control. Aluminum like 6061 is sensitive to the heat affected zone (HAZ). Too much heat, too long, or poor fixture control can weaken the area beside the weld even if the bead itself looks fine. That’s why serious factories lock this junction in stable jigs and manage thermal balance instead of letting tubes “walk” during welding.
If you’re requesting documentation, don’t settle for only photos. Ask for dye penetrant testing (DPT) results around the head tube area, and ask how they validate fatigue performance against ISO 4210 expectations for bicycle frames. At ClipClop, we run head tube fatigue tests that compress years of abuse into a short lab cycle—because the market won’t forgive a front-end failure.
Finally, alignment is non-negotiable. A distorted head tube angle can ruin handling and cause assembly headaches. For fast e-bikes hitting 55 km/h, tight tolerance matters. If a supplier can’t show post-weld alignment inspection (CMM or equivalent), your assembly line will end up doing “manual persuasion,” and your customers will feel it in the ride.
2) Motor mount: where torque turns small mistakes into big noise
Mid-drive motor mounts separate true e-bike frame engineering from “regular bike factory with a new catalog.” A mid-drive doesn’t just add weight; it adds constant torsional stress and vibration. If the mount is even slightly off, you get chainline issues, drivetrain wear, and that infamous creaking noise that triggers customer complaints and service tickets.
Start with the mounting face. A CNC machined, flat, stable surface is a good sign because it reduces micro-movement between motor and frame. Then look at reinforcement: the structure around the mount should distribute load into the down tube and seat tube area, not concentrate stress in a thin ring of weld.
Tolerance is where many failures begin. Even a 1 mm deviation can create uneven bolt pressure, which slowly loosens fasteners under vibration. In rental fleets, that turns into repeat maintenance. In retail, it becomes bad reviews and returns.
This is also where post-weld heat treatment matters. If a factory welds 6061 and ships without proper restoration of strength, the mount area becomes a fatigue trap. The weld may hold today, but repeated torque cycles will punish the softened zone near the joint. Ask for hardness logs or a clear description of their heat treatment process (not just “we do heat treatment,” but what stage, how controlled, and how they verify results).
In our production approach, we often see value in robotic welding for repetitive seams and controlled geometry, then skilled manual TIG where access is complex and stresses are highest. The point isn’t “robot vs human” as a slogan—it’s choosing the method that produces consistent penetration and stable dimensions for the exact junction.
3) Battery mount area: the hidden engineering inside the downtube
Integrated downtube batteries look sleek, but engineers know the uncomfortable truth: you’re cutting a big cavity into a structural tube, then asking it to remain stiff while carrying a heavy battery through vibration and impacts. If the internal rails or brackets are weak, the battery rattles, connectors get damaged, and the frame becomes a noise generator.
For buyers, the practical inspection is partly visual and partly procedural. Visually, look inside the battery cavity (when possible) for weld slag, sharp protrusions, or uneven beads that could interfere with battery insertion and removal. These details sound small until your end-user can’t pull the battery out without a fight.
Procedurally, ask how they test hidden welds. Ultrasonic testing (UT) can be used to validate fusion on internal brackets that you can’t see after finishing. If a supplier says “no need,” treat that as a risk signal—because hidden welds are exactly where shortcuts hide.
Don’t ignore corrosion protection, either. Water ingress and trapped moisture in the battery cavity can cause long-term issues if internal coating coverage is weak. Many high-quality lines use a base protection layer like ED coating to reach hidden areas, then powder coating for the exterior finish. In B2B terms: this is how you justify longer warranties without gambling.
Lastly, pay attention to battery boss welding (threaded mounts). These small points get hammered by vibration. Ask for pull-out test results or at least their internal standard. When a battery mount fails, customers don’t describe it as “boss strength deficiency.” They describe it as “cheap bike.”
4) Rear dropouts: the end of the frame that takes all the blame
Dropouts are the quiet workhorses: they carry rider load, absorb braking forces, and—on hub-motor builds—manage rotational torque that wants to twist the axle out of position. If your dropout zone is weak or misaligned, you’ll see rotor rub, shifting problems, and in extreme cases, axle spin-out damage that can destroy the frame.
Strong dropouts usually start with material and geometry: thicker CNC machined dropouts with a big welding surface area are easier to fuse properly than thin stamped parts. Then you look for full penetration and clean transitions—no crater-like stops, no obvious porosity, no “skin weld” sitting on top of base metal.
Alignment checks matter here more than people admit. If spacing is off (like for 12×148 Boost), the whole rear triangle becomes a tolerance stack problem. A good supplier will show you alignment gauge results for each batch, not just a confident smile.
If you’re sourcing frames for high-power hub motors, ask about anti-rotation design and torque arm integration. Cheap conversions often fail because the dropout wasn’t designed for electric torque. A purpose-built e-bike frame treats the dropout as an engineering node, not a leftover bicycle part.
Impact and fatigue validation is the final filter. When a supplier can show they drop-test or fatigue-test the rear end under realistic loads, that’s when you know they’re serious about lifecycle performance—not just passing a quick visual inspection.
TIG vs robotic welding: what buyers should actually care about
The real question isn’t “which is better,” it’s “which produces consistent penetration and stable geometry at your scale.” TIG can be excellent when the welder is skilled and the junction is complex. Robotic welding shines in repeatability, especially for long seams and volume production where every unit must match your CAD intent.
At ClipClop, a hybrid approach often makes the most sense: robots for repetitive, high-consistency areas, and master welders for junctions that demand judgment and access control. Your MOQ, design uniqueness, and timeline usually decide the best mix more than ideology does.
No matter the method, penetration is the king metric. A beautiful bead that doesn’t fuse deep is a cosmetic illusion. If you can, ask for sample cross-sections from process validation, plus a clear description of how they control cooling and distortion after welding.
Heat treatment and QC: the unglamorous stuff that saves your margins
Aluminum frames live or die by what happens after welding. The HAZ softens the area near the joint, and without proper post-weld treatment, you’re shipping frames that may look premium but behave like they’re half-strength under fatigue loads.
High-quality suppliers will show you material certificates, hardness logs, and a traceability system that links frames to batches, welding stations, and treatment records. Add NDT methods where appropriate (DPT, UT, X-ray for first articles), and dimensional verification (CMM) when geometry must be tight.
In B2B, this isn’t paperwork theatre. It’s how you avoid a “silent defect” spreading across a shipment.
Choosing an OEM partner that won’t create future problems
If you’re sourcing for long-term distribution, don’t shop frames like commodities. Shop them like risk management products. Ask for evidence: fatigue testing, alignment reports, heat treatment verification, and a clear explanation of how they control fixtures and distortion.
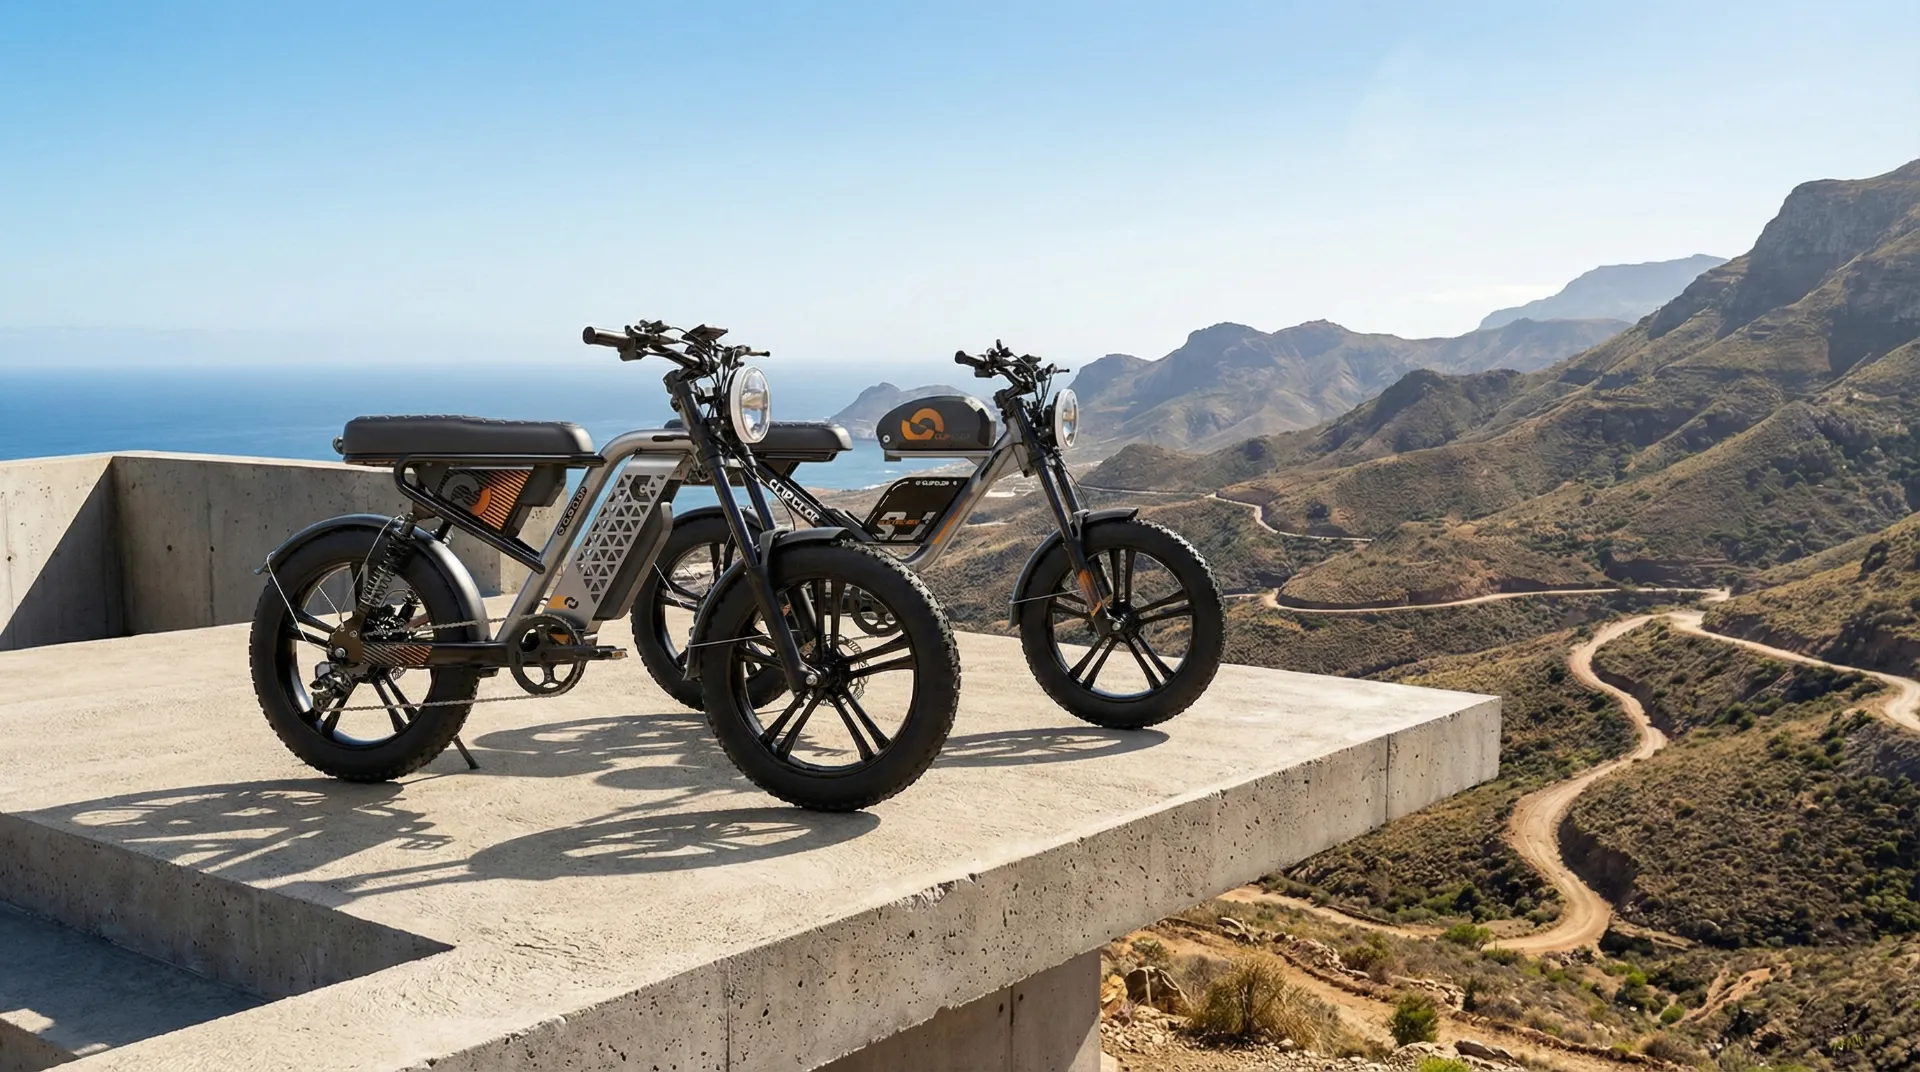
If you want a proven platform, we often point partners to battle-tested designs like our L1 model concept—built around an aluminum alloy 6061 frame, accommodating modern battery formats and motor options (250W to 750W). The key isn’t the spec sheet; it’s the disciplined execution at those four junctions, batch after batch.
If you’d like, you can send your target motor/battery/brake standards and your expected use case (rental, delivery, off-road retail). I can help you translate that into a practical inspection checklist and the exact documents to request in an RFQ—so you’re negotiating quality, not guessing it.
FAQ & Extended Reading
Q: Why is 6061-T6 better than 7005 for e-bike frames? A: While 7005 is stronger, 6061-T6 aluminum is more corrosion-resistant and easier to weld consistently. For electric off-road bikes, 6061 offers a better balance of weight and fatigue resistance when paired with proper post-weld heat treatment.
Q: Can I use a standard bicycle frame for a high-power e-bike? A: No. A standard frame lacks the reinforced weld joints and specialized motor mount needed to handle the torque and weight of an electric system. Always source from a dedicated e-bike frame manufacturer.
Q: How do you prevent the battery from rattling in the frame? A: We use precision battery mount welding and internal rubber dampeners. The vibration resistance is tested during our CMM dimensional inspection and physical shake tests.
Q: What is the typical lead time for a custom OEM frame order? A: For a custom e-bike frame factory, the e-bike frame lead time is usually 45-60 days for a new design, including tooling, prototyping, and the first production run.
Q: Do you offer samples before bulk orders? A: Yes, we highly recommend an e-bike frame sample order. It allows you to perform your own weld inspection and assembly testing before committing to a bulk e-bike frame order.
Focus Keywords: E-bike Frame Manufacturer, Electric Bicycle Frame Supplier, OEM E-bike Frame, E-bike Frame Welding Quality, 6061-T6 Aluminum E-bike Frame.
References: