

I still remember the exact moment I decided to convert my old Trek hybrid instead of dropping three grand on a new e-bike. My stomach dropped when I added up what I riding maybe twice a week — why was I paying premium prices for something I’d barely use? That was three years ago, and I’ve since helped friends convert four different bikes, watched the market shift dramatically, and yes, made a few mistakes along the way. This guide is everything I wish someone had handed me before I started.
Disclosure: This article contains affiliate links. If you buy through links on this site, we may earn a small commission at no extra cost to you. We only recommend products we’d use ourselves.
What Is an Electric Bike Conversion Kit — and Is It Worth It?
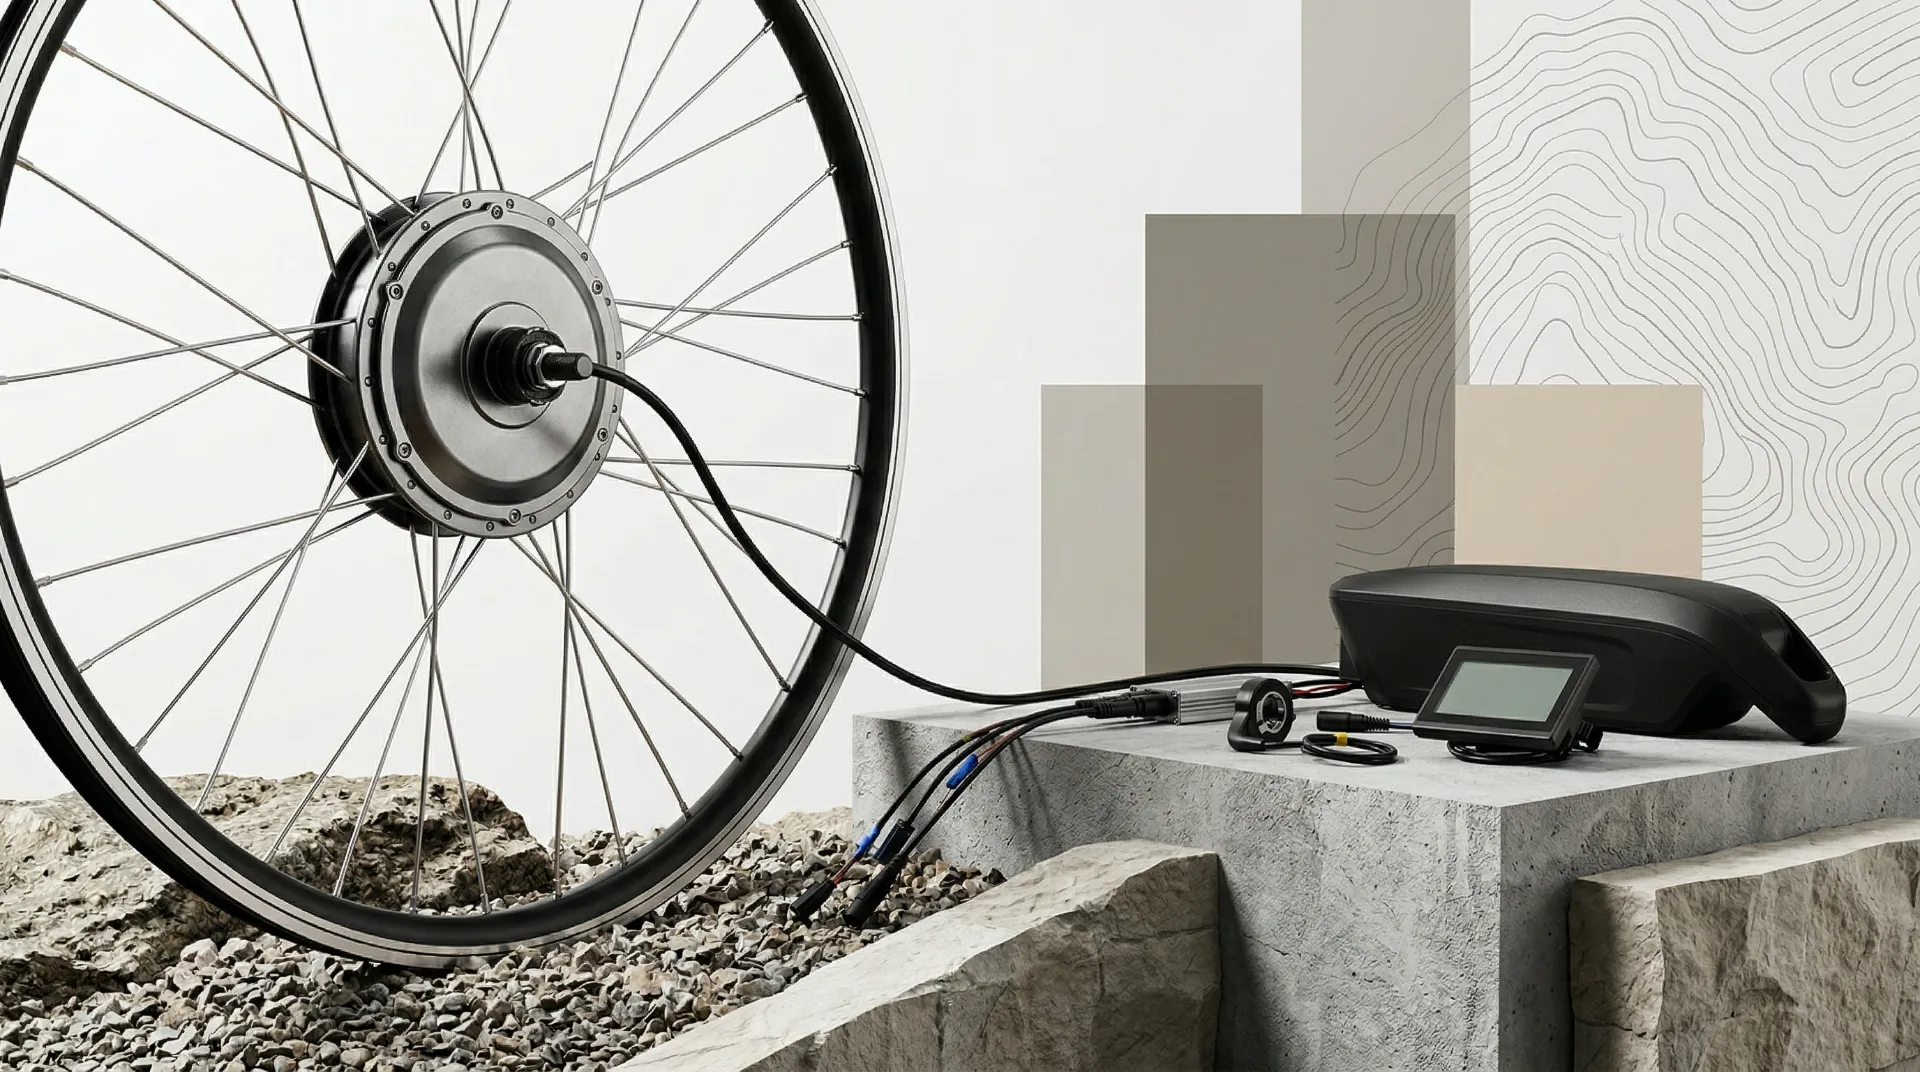
An electric bike conversion kit is basically a do-it-yourself upgrade package that transforms your existing pedal bicycle into an electric bike. You keep your original frame, wheels, brakes, and drivetrain — you bolt on a motor, strap on a battery, and wire in a controller. Suddenly your commuter bike has electric assist, your weekend trail bike has extra oomph, or your cargo bike can actually handle those hills.
In my experience, there are two main reasons people go the conversion route. First, cost — a decent conversion kit starts around $150 to $300 for basic systems, while a pre-built e-bike with comparable quality often runs $1,500 or more. Second, sentimentality. I know more than a few riders who aren’t giving up a bike they’ve ridden for a decade just because it doesn’t have a motor. Their frames fit perfectly, their components are dialed in, and frankly, they just love those bikes.
But here’s the controversial take I mentioned — and I know this will ruffle some feathers. For most riders on a budget, a quality conversion kit actually outperforms a budget pre-built e-bike at the same price point. You might be thinking, “Wait, isn’t a purpose-built e-bike going to be better engineered?” And in an ideal world, yes. But in the real world, when you’re spending $500 to $800 on a pre-built e-bike, you’re getting a bike that compromises on everything — the motor is generic, the battery cells are questionable, and the components are entry-level at best. Convert a quality older bike with a $500 kit, and you end up with a far superior ride. The critical mistake to avoid, though, is choosing the wrong motor type for your terrain — more on that in section three.
Is a conversion worth it? I’d say it depends heavily on your goals, your bike’s condition, and how much tinkering you want to do. If your current bike is in decent shape and you enjoy understanding how things work, conversion kits offer extraordinary value. If you want something plug-and-play and never touch a wrench, buy new.
The Three Core Components: Motor, Battery, and Controller
Every electric bike conversion kit revolves around three pieces of hardware. Understanding what each does will save you from making expensive mistakes, I promise.
Die Motor is exactly what it sounds like — the unit that generates propulsion. Motors come housed in wheel hubs (replacing your existing wheel) or as mid-drive units that mount where your bottom bracket sits. The motor rating is measured in watts, and in most jurisdictions you’ll want something in the 250W to 500W range to stay street-legal.
Die Der Akku is where your money actually goes. A quality battery pack from Samsung, Panasonic, or LG cells will cost $200 to $600 depending on capacity, and it’s genuinely the component where you should never skimp. Cheap batteries are the primary reason cheap e-bikes fail — they lose capacity fast, can overheat, and in extreme cases pose safety risks. The battery management system (BMS) built into quality packs protects against overcharging, deep discharging, and temperature extremes.
Die controller is the hidden hero — a small computer that sits between your battery and motor, governing power delivery based on input from your throttle or pedal assist sensor. It translates your inputs into smooth, controlled power. Budget kits often use generic controllers that feel jerky or unresponsive. Mid-tier and premium kits from Bafang or Bosch use controllers that are genuinely impressive in how natural the power delivery feels.
I’ve found that many buyers obsess over motor power and completely neglect the controller and battery quality. You can have a 750W motor and still have a terrible ride if your controller is garbage. Conversely, a 250W mid-drive system with a great controller and a solid battery will feel orders of magnitude better. Prioritize in this order: battery quality, controller sophistication, then motor power.
Motor Types: Hub vs Mid-Drive — Getting the Right Power Delivery
This is the section where most people make the critical mistake I warned about earlier. Hub motors and mid-drive motors are fundamentally different animals, and picking the wrong type for your terrain will make your conversion feel like a punishment rather than an upgrade.
Hub motors — whether installed as a front hub motor kit or rear hub motor kit — drive the wheel directly from the hub shell. The motor pushes or pulls the wheel independent of your drivetrain. In my experience, front hub motors are easier to install (they just replace your front wheel) but can feel weird on climbs because they pull rather than push. Rear hub motors feel more natural — they push you forward — but installing them requires dealing with your cassette or freewheel.
The Nine Continent and MXUS brands dominate the hub motor space, and for good reason. Nine Continent motors are known for durability and smooth operation, while MXUS tends to offer excellent torque at competitive prices. I’ve used both on different builds and would say Nine Continent edges out slightly in longevity, but MXUS wins on raw value.
Mid-drive motors sit at the bottom bracket and drive the chain like your legs do. This is where things get interesting — mid-drives leverage your bike’s existing gears, which means on hills you can shift to a lower gear and let the motor work at optimal RPM. The result is dramatically better performance on varied terrain. Bafang’s BBS02 and BBSHD mid-drive kits are the gold standard for conversion applications, while Bosch and Shimano motors are more commonly found on purpose-built e-bikes but offer exceptional quality.
Here’s my stance, and I’ll defend it: if you ride flat to rolling terrain, a hub motor is perfectly adequate and significantly cheaper. But if you ride hills, carry cargo, or tackle varied trail conditions, a mid-drive conversion is worth every extra dollar. I learned this the hard way when I put a rear hub motor on my hill-heavy commuter route. My legs were fine; my throttle hand was not, because the hub motor just couldn’t maintain speed on sustained 8% grades without overheating. Switching to a Bafang mid-drive system fixed that overnight.
A torque arm is non-negotiable on any hub motor installation, by the way. The motor axle experiences extreme shear forces, and without a torque arm anchoring the axle to your frame, you’ll eventually strip your dropout or damage your fork. Yes, it adds $15 to $30 and fifteen minutes of installation time. No, you cannot skip it.
Battery Specs Demystified: Volts, Amps, and Real-World Range
Battery specs look like alphabet soup until you break them down into what actually matters for your ride. I’ll keep this practical because I remember how confused I was the first time I looked at a battery listing and saw “36V 14Ah 504Wh.”
Spannung (V) determines your top speed. A 36V battery paired with a typical 250W motor will get you around 25 to 28 km/h on flat ground — which, conveniently, is the EU speed limit and close to many US Class 2 e-bike definitions. A 48V battery with the same motor will push you closer to 30 to 35 km/h, which matters more than you’d think on roads with traffic.
Amp hours (Ah) is your capacity — how much charge the battery holds. Think of it like the size of your fuel tank. A 14Ah battery holds more than a 10Ah battery at the same voltage.
Watt hours (Wh) is the real measure of range, calculated by multiplying volts times amp hours. A 48V 14Ah battery is 672Wh. A 36V 14Ah battery is 504Wh. The 672Wh pack will generally give you about 30% more range assuming identical riding conditions.
In my experience, most commuters want a 36V 10Ah to 14Ah battery (360 to 504Wh) which gives you 30 to 60 kilometers of real-world range depending on assist level and terrain. If you’re running a powerful motor or want serious range for longer rides, look at 48V 14Ah to 20Ah setups (672Wh to 960Wh). I personally run a 48V 15Ah on my main build and get roughly 70 kilometers per charge with mixed urban riding.
The cell brand genuinely matters. Samsung, Panasonic, and LG cells consistently outperform generic cells in longevity testing — we’re talking 80% capacity retention after 500 charge cycles versus often below 60% for no-name cells. The premium costs maybe $50 to $100 more upfront. You will absolutely get that money back over the life of the battery.
One more thing about BMS battery management — quality packs include a BMS that prevents overcharging, deep discharging, and short circuits. Cheap packs sometimes list a BMS but use undersized protection circuits. Read reviews and buy from established sellers. I’ve seen too many people save $40 on a battery that caught smoke two months later.
Compatibility Check: Will It Fit Your Bike?
Before you buy anything, you need to verify your bike can actually accept a conversion kit. This step is where a lot of first-timers jump the gun, and I understand the excitement — I was the same when I bought my first kit. But compatibility issues can turn a weekend project into a permanent shelf ornament.
First, check your dropout width — that’s the width of the slot in your frame where the axle sits. Most modern bikes use 135mm for rear wheels and 100mm for front wheels. Some older bikes used non-standard widths, and certain fat tire bikes need much wider setups. Measure before you buy.
Second, consider your axle type. Quick-release (QR) axles are common on newer bikes — they’re the type where you can remove the wheel by opening a lever without tools. Bolt-through axles (thru-axles) are increasingly common on higher-end bikes and require adapters or specific motor kits designed for them. If you have thru-axles and buy a standard QR motor kit, it simply won’t fit without modification.
Third, examine your bottom bracket width. Mid-drive motors like the Bafang BBS series require a specific bottom bracket shell width — typically 68mm to 73mm, which covers the vast majority of modern bikes. But some older European bikes, certain folders, and some carbon fiber frames use non-standard widths. Measure twice, buy once.
Fourth, think about frame material and condition. Aluminum frames are generally excellent for conversions. Steel frames work great but add weight. Carbon fiber frames are more controversial — the motor torque and additional stress at the dropout area concern some mechanics. If your carbon frame is relatively new and from a reputable brand, a conversion is usually fine, but I’d strongly recommend having a professional shop do the installation.
Also consider whether your bike has adequate mounting points for a battery. Most kits include a mounting bracket that clamps to your down tube or seat tube. Some frames with unusual geometry or heavy tubing don’t leave clear mounting options. A rear rack battery setup is a viable workaround for many of these cases, though it changes your bike’s weight distribution.
You might be thinking, “This sounds complicated — should I just buy a purpose-built e-bike?” That’s a fair question. If your bike is incompatible with most standard kits and you’re not comfortable with custom work, then yes, buying new might be the smarter move. But for the vast majority of bikes on the road today, there’s a compatible conversion option available.
The Complete Installation Process (Even If You’re New to This)
Here’s the thing about installing a conversion kit — it sounds intimidating until you actually do it. Then you realize most of it is just threading cables and tightening bolts. I’ve guided three friends through their first conversions, none of whom had prior bike mechanic experience, and all of them finished in an afternoon.
The basic sequence goes like this. Swap your existing wheel with the motor wheel — either front or rear depending on your kit type. Install the chainring adapter if you’re running a mid-drive, which involves removing your old chainring and crankset. Mount the controller to your frame using the included straps or bolts. Position the battery on your down tube or rear rack. Run the wiring from motor to controller to battery, connecting each component to its matching plug. Install your throttle on the handlebar and your pedal assist sensor (PAS sensor) on the chainstay. Finally, test everything before you take your first ride.
The trickiest part for beginners is usually the PAS sensor — that’s the little device that detects when you’re pedaling and tells the controller to deliver power. Getting the magnet wheel aligned properly with the sensor takes about fifteen minutes of patience the first time. After that, you’ll understand why it’s important and it’ll make sense.
One thing I’d strongly recommend: before you start, watch two or three YouTube videos specific to your kit model. Bafang BBS02 installs, for instance, have been documented extensively. The difference between watching a video and going in blind is probably an hour of frustration.
Also, invest $20 in a proper hex key set if you don’t have one. Most conversion kit fasteners use hex bolts, and having the right size matters more than you’d think. Stripped hex bolts are nobody’s idea of a fun afternoon.
2026 Pricing Guide: What to Expect at Every Budget Level
Let me break this down honestly because pricing is where a lot of buyers get misled. The electric bike conversion kit market in 2026 covers a huge range, and understanding what you’re getting at each tier will save you from either overspending or, more commonly, buying garbage.
Budget tier: $100 to $250
This is the entry point. You can find basic front hub motor kits in this range, typically 250W to 350W, with generic batteries around 36V 8Ah to 10Ah. In my experience, these are fine for extremely light use — think flat campus commutes, short urban trips on level ground. The motor is usually a brushless design of unknown origin, the battery cells are generic at best, and the controller is rudimentary. The torque is minimal. You get what you pay for, basically. If you’re serious about riding, I’d skip this tier entirely.
Mid-range: $250 to $600
This is where things get actually good. Quality rear hub motor kits from Nine Continent or MXUS land here, typically with 500W continuous power and 48V battery options. You can also find entry-level mid-drive kits like the Bafang BBS01 in this range. Battery quality from Samsung or Panasonic cells becomes available, giving you realistic range and cycle life. The controller is programmable and the throttle response is smooth. I’d say this is the sweet spot for most riders.
Premium: $600 bis $1.200+
Bei dieser Stufe erhalten Sie ernsthafte Leistung. Bafang BBSHD-Mitteltriebssets, vollständige Bosch- oder Shimano-STEPS-Systeme und Akkus mit 48V 15Ah bis 20Ah von Samsung oder LG. Diese Setups können einen Urban-Commuter-Bereich erfolgreich durch einen Verbrennungsfahrzeug ersetzen. Die Installation ist immer noch DIY-freundlich, aber die Komponenten sind auf einer Ebene, wo die Zuverlässigkeit hervorragend ist und die Fahrtqualität wirklich beeindruckend ist. Für Flottenbetreiber – was unser B2B-Perspektive betrifft – ist diese Stufe der Umrechnungskits die finanziell sinnvollste Option im Vergleich zum Kauf von Fertigfahrzeugen gleicher Qualität.
Häufige Fehler, die die Garantie aufheben – und wie man sie vermeidet
Ich habe bei meiner ersten Umrechnung einige Fehler gemacht, die mich sowohl Zeit als auch Geld gekostet haben. Ich möchte Sie davor bewahren.
Der größte ist das Runterfahren der Batterie zu weit. Die meisten Qualitäts-Lithium-Akkus haben einen Spannungs-Schwellwert, aber wenn Sie eine 48V-Batterie konsequent auf 10% oder darunter entleeren, reduzieren Sie die Zyklenlebensdauer erheblich. Ich versuche, auf 20% bis 25% verbleibend zu laden. Es klingt nach Fummeligkeit, aber Ihre Batterie hält doppelt so lang.
Zweitens, Wasser und Stecker sind nicht Freunde. Diese Sets sind wetterbeständig, nicht wasserdicht. Ich bin in Regen geritten, ohne Probleme, aber das Hochdruckspülen des Fahrrads oder das Lassen im Regen wird zu Störungen an den Steckern und unterbrechenden elektrischen Problemen führen. Was uns zu… äh, nein, lassen Sie mich einfach den dritten nennen.
Drittens: das Überziehen der Achsschrauben. Bei HUB-Motoren gibt es eine feine Linie zwischen sicher und gefährlich fest. Das Überziehen auf einem dünnen Aluminium-Lenker kann die Lenker tatsächlich auseinanderdrücken oder brechen. Verwenden Sie eine Schraubzwinge, wenn Sie haben, oder ziehen Sie die Teile fest und prüfen Sie nach ein paar Fahrten.
Vierter, und dieses Problem voidet Garantien, wie viele Leute bemerken, — das Verwenden des falschen Ladegeräts. Wenn Sie Ihren Charger verlieren und einen generischen von Amazon kaufen, der die richtige Spannung hat, aber die falsche Amperage oder Ladespezifikation, kann der BMS oder die Zellen beschädigt werden. Halten Sie sich an den vom Hersteller spezifizierten Charger oder einen exakten Ersatz.
Die Bilanz: Wer ist bereit für eine Umrechnung – und wer sollte ein neues Fahrrad kaufen?
Ich möchte mit Ihnen ehrlich sein, denn genau das ist Ziel dieser Anleitung.
Sie sollten wahrscheinlich umrüsten, wenn: Ihr aktuelles Fahrrad in gutem strukturellen Zustand ist, Sie sich auf Tinkering und das Verständnis von Systemen freuen, Sie bessere Werte als Budget-E-Bikes bieten möchten, Sie einen spezifischen Anwendungsfall haben, den ein speziell gebautes E-Bike nicht gut adressiert, oder Sie eine Flotte betreiben und bestehende Bestände zu kontrollierten Kosten aktualisieren möchten.
Sie sollten wahrscheinlich ein neues Fahrrad kaufen, wenn: Die Fahrradrahmen gebrochen oder strukturell beschädigt sind, Sie keine mechanische Einbindung wollen und ein vollständig gewährtes Komplettsystem benötigen, Ihr Fahrrad ungewöhnliche Komponenten hat, die die Kompatibilität mit Umrechnungskits erschweren, oder Sie ein Fahrrad benötigen, ohne dass Assembly-Arbeiten erforderlich sind.
Für die Flottenbetreiber, die dies lesen – Flottenmanager, Mietverleih, OEM-Kunden – sind Umrechnungskits 2026 eine wirklich overzeugende Option. Die Wirtschaftlichkeit ist klar: Die Umrechnung einer Flotte aus qualitativ hochwertigen Fahrrädern kostet deutlich weniger als der Kauf von äquivalenter Fertig-E-Bikes, und die Komponenten sind wartbar und austauschbar. Wir haben Betreiber beobachtet, die die Kosten pro Einheit um 40% bis 60% reduzierten, indem sie Umrechnungsansätze für bestimmte Anwendungsfälle verwendeten, insbesondere für mittleren Leistungsbedarf in städtischen Lieferungen und Campus-Verkehrsmittel.
Aber hier ist das Problem: Das funktioniert nur, wenn Ihre Flottenfahrräder wertvoll genug für eine Umrechnung sind. Hochwertige Rahmen mit Standardgeometrie, angemessenem Zustand und kompatiblen Breiten der Ausläufer. Wählen Sie die richtigen Fahrräder aus, und die Rechnung zählt für Sie. Wählen Sie unsinnige Fahrräder aus, und Sie verbringen mehr Geld für Reparaturen als Sie gespart haben.
Frequently Asked Questions
Wie viel kostet ein E-Bike-Umreichungskit?
Einfache Sets beginnen bei $150 bis $300. Mittelwertige Sets mit besseren Motoren und Akkus kosten typischerweise $250 bis $600. Premium-Systeme mit Mitteltriebsmotoren und hohen Akkukapazitäten kosten $600 bis $1.200 oder mehr. Die Gesamtkosten hängen von der Eigeninstallation ab.
Kann ich jedes Fahrrad in ein E-Bike umwandeln?
Die meisten Fahrräder können umgerüstet werden, aber die Kompatibilität hängt von der Breite der Ausläufer, der Achstyp, der Breite des Untersetzers und dem Zustand des Rahmen ab. Standardmoderne Fahrräder mit 135mm-Rahmenausläufer-Breite und 68mm bis 73mm-Untersetzerbreite sind mit allen großen Kit-Marken kompatibel.
Ist es günstiger, ein E-Bike zu bauen oder zu kaufen?
Für äquivalente Qualität ist das Bauen mit einem Umreichungskit fast immer günstiger. Ein $500-Umreichungskit auf einem qualitativ hochwertigen $300-Fahrrad bietet in den meisten Fällen eine bessere Fahrt als ein $800-Fertig-E-Bike. Die Ausnahme ist, dass Fertig-E-Bikes Komfort und integrierte Garantie bieten, die DIY-Builds nicht bieten.
Was ist das beste E-Bike-Umreichungskit 2026?
Das Bafang BBSHD-Mitteltriebsset bleibt das Goldstandard für die meisten Fahrer – leistungsstark, zuverlässig und gut unterstützt. Als HUB-Motor-Optionen bieten Nine Continent Motoren hervorragende Haltbarkeit. Bei Akkus bieten Samsung- und Panasonic-Zellen in 48V-Konfigurationen die beste Reichweite und Langlebigkeit.
Wie lange dauert die Installation eines E-Bike-Umreichungskits?
Die erste Installation dauert typischerweise drei bis fünf Stunden. Erfahrene Mechaniker schließen die Arbeit in einer bis zwei Stunden ab. Planen Sie entsprechend und nicht zu schnell – die Ausrichtung des PAS-Sensors ist wichtig.
Sind Umreichungskits zuverlässig?
Qualitativ hochwertige Umreichungskits etablierter Marken sind extrem zuverlässig mit ordnungsgemäßer Wartung. Die Schlüssekomponenten – Motoren, Controller, Akkus – sind industrielle Produkte, die für Tausende von Betriebsstunden konzipiert sind. Die Schwachstellen sind Stecker, Kabel und Akkus, die missbraucht werden.
Was ist der Unterschied zwischen HUB-Motor und Mitteltrieb?
HUB-Motoren antreiben das Rad direkt und funktionieren unabhängig von den Schaltungen. Mitteltriebsmotoren sitzen am Untersetzer und nutzen das vorhandene Schaltwerk des Fahrrads. Mitteltriebsmotoren leisten dramatisch besser auf Hügeln und variiertem Gelände; HUB-Motoren sind einfacher und günstiger, aber weniger leistungsfähig bei anspruchsvollen Routen.
Verletzen Umreichungskits die Fahrradgarantie?
Generell nicht, außer der Fahrradhersteller verbietet ausdrücklich Modifikationen – was selten ist. Umreichungskits können jedoch den Verschleiß bestimmter Komponenten beschleunigen, insbesondere die Ausläuferbereiche bei HUB-Motor-Installationen. Die Verwendung eines Drehmomentarms ist entscheidend, um Rahmenschäden zu vermeiden.
Dieser Leitfaden dient ausschließlich informierenden Zwecken. E-Bike-Gesetze und Vorschriften variieren stark nach Land, Bundesstaat und Gemeinde. Vor der Installation eines Umreichungskits müssen Sie die lokalen Vorschriften hinsichtlich Motorleistungsbegrenzungen, maximale unterstützte Geschwindigkeiten und Orte überprüfen, an denen E-Bikes zugelassen sind. In der EU muss das meistens unter 25km/h für Pedalhilfssysteme entsprechen. In den USA sind Klasse-2-E-Bikes mit Drehgriffel auf öffentlichen Wegen auf 20 mph (32 km/h) begrenzt, wobei die Regeln der Bundesstaaten und Gemeinden variieren. Fahren Sie verantwortungsbewusst und innerhalb des Gesetzes.



 English
  Spanish
  Portuguese
  Russian
  Arabic
  French
  Dutch
Dutch  German
  Danish
